This is a postmortem about the development and the experiment of my Master’s thesis.
About me
Hi, my name is Roman and I am a gamedev enthusiast. I like to participate in game jams, try out all the new things, learn stuff and more.
Currently, I am finishing up my master’s studies of IT management at Faculty of Informatics at Masaryk University in Brno, Czech Republic. I chose a VR research as my Master’s thesis and this is a postmortem mostly about the development and the experiment. Now, I am analyzing the data from the experiment and writing the thesis.
About Softy Simness
Softy Simness is a nickname I came up with for my Master’s thesis VR project. It is a scene made in Unity. It is a passive sitting experience. Its purpose is to test my thesis project with volunteers in a controllable and comparable fashion. It takes 5 minutes. During this scene, users are being transported through the virtual environment. After they finish watching the scene they fill in a few standardized questionnaires – SSQ, Nasa TLX and Presence Questionnaire.
What went right
Setting up VR in Unity
If you have ever tried developing a VR project in Unity you probably know this. For everyone else who wishes to try developing a VR – give it a shot. In Unity it is very easy to enable VR. Just follow the official tutorial – it’s just a few mouse clicks ????

Size of the scene
At the beginning, I created a default size terrain in Unity. Then I added a few waypoints (with default speed) around the map and measured the time it took it to go one loop. I wanted to have a 15-minute experiment so I created a new terrain with corresponding map size. It took me longer than I had expected to build a track on half of the large map. I spent a lot of time on performance optimizations and changes in map design to allow for additional tweaks. So in the end I ended up with 5-minute experiment which was optimized and completed. I was worried it would not be enough because in some academic papers I read it was recommended to have about 10-20 minutes VR sessions for the experiments. But my thesis advisor wanted me to start testing early (because he knew it would be hard to look for volunteers) with the scene I had already. In the end, 5 minutes proved long enough for my test purposes and it was also easier to test because each session with a volunteer took less time.
Looking for volunteers
I knew from the beginning that I would need volunteers to participate in my experiment. I set up a Facebook page Virtual Reality Research Brno and started messaging my friends. I tried not to spam everybody all at once, but to message just about 10 people a day. I also did not mass invite everyone all at once. I messaged a friend and sent them an invite. I used a template for the message but changed it over time. After some time the page had about 100 followers. All of them were my facebook friends.
The next thing I did was to join facebook groups mostly for students (different universities and faculties, fields of studies/years, dormitories, volunteer groups, groups for advertising, free time and jobs). I created a facebook event for the first week of the testing (week-long event), setup Doodle page, put a link to this doodle in facebook event and posted this event in a few groups.
Facebook event reached 6700 people (461 viewed, 48 responded), but only 14 people registered on doodle. A bad conversion rate. 3 people did not show up. So I had 11 volunteers in the first week of the experiment. Also, there were issues with doodle (it was in beta with their new UI).
Next time I changed my approach. I made a google sheet document with a calendar for registration and all the important info in the box below it. I made facebook event too. But this time I posted the link directly to registration calendar (google sheet) in facebook groups. It was a lot better.
In the following weeks, I continued to improve my registration calendar, information for participants and kept posting infrequently in the different facebook groups. Even though I did not mass spam them all at once – about 10 proved to be a limit. After posting the same message for too many times, facebook shows a warning to stop you from spamming. This led me to create a document with a few different messages to copy and paste them in facebook groups. There were groups in which my posts were not welcome and marked me as spam. I got blocked for 24 hours from posting in any facebook group. However, I found my way around it. You can comment on your post even when you are blocked from sharing a new post there. Commenting on a post pushes this post to the top.

To make participation in my experiment more appealing to the potential volunteers I made an agreement with a friend of mine who runs a VR arcade. He printed discount vouchers to his arcade for me. And I inserted this voucher with an envelope and put a sticker on it. To have something to give volunteers, something for them to take home. In my facebook post, I also targeted people who had never tried VR before, that they could give it a try for free. I also appealed to students to help a fellow student with his thesis. Some people were just curious about the experiment. These steps helped me to get 60 volunteers within 5 weeks. Over the summer holiday. Most of them were students. It was intense, I had almost no free time because I was testing on weekends too. But it was worth it.

I continue to share interesting or funny VR posts in the facebook page. I am not the only student doing experiments with VR at our university. A colleague of mine started testing a few weeks ago too. I made him a moderator of the facebook page and shared my experience with him.
What went wrong
Level Design incompatible with performance demanding VR
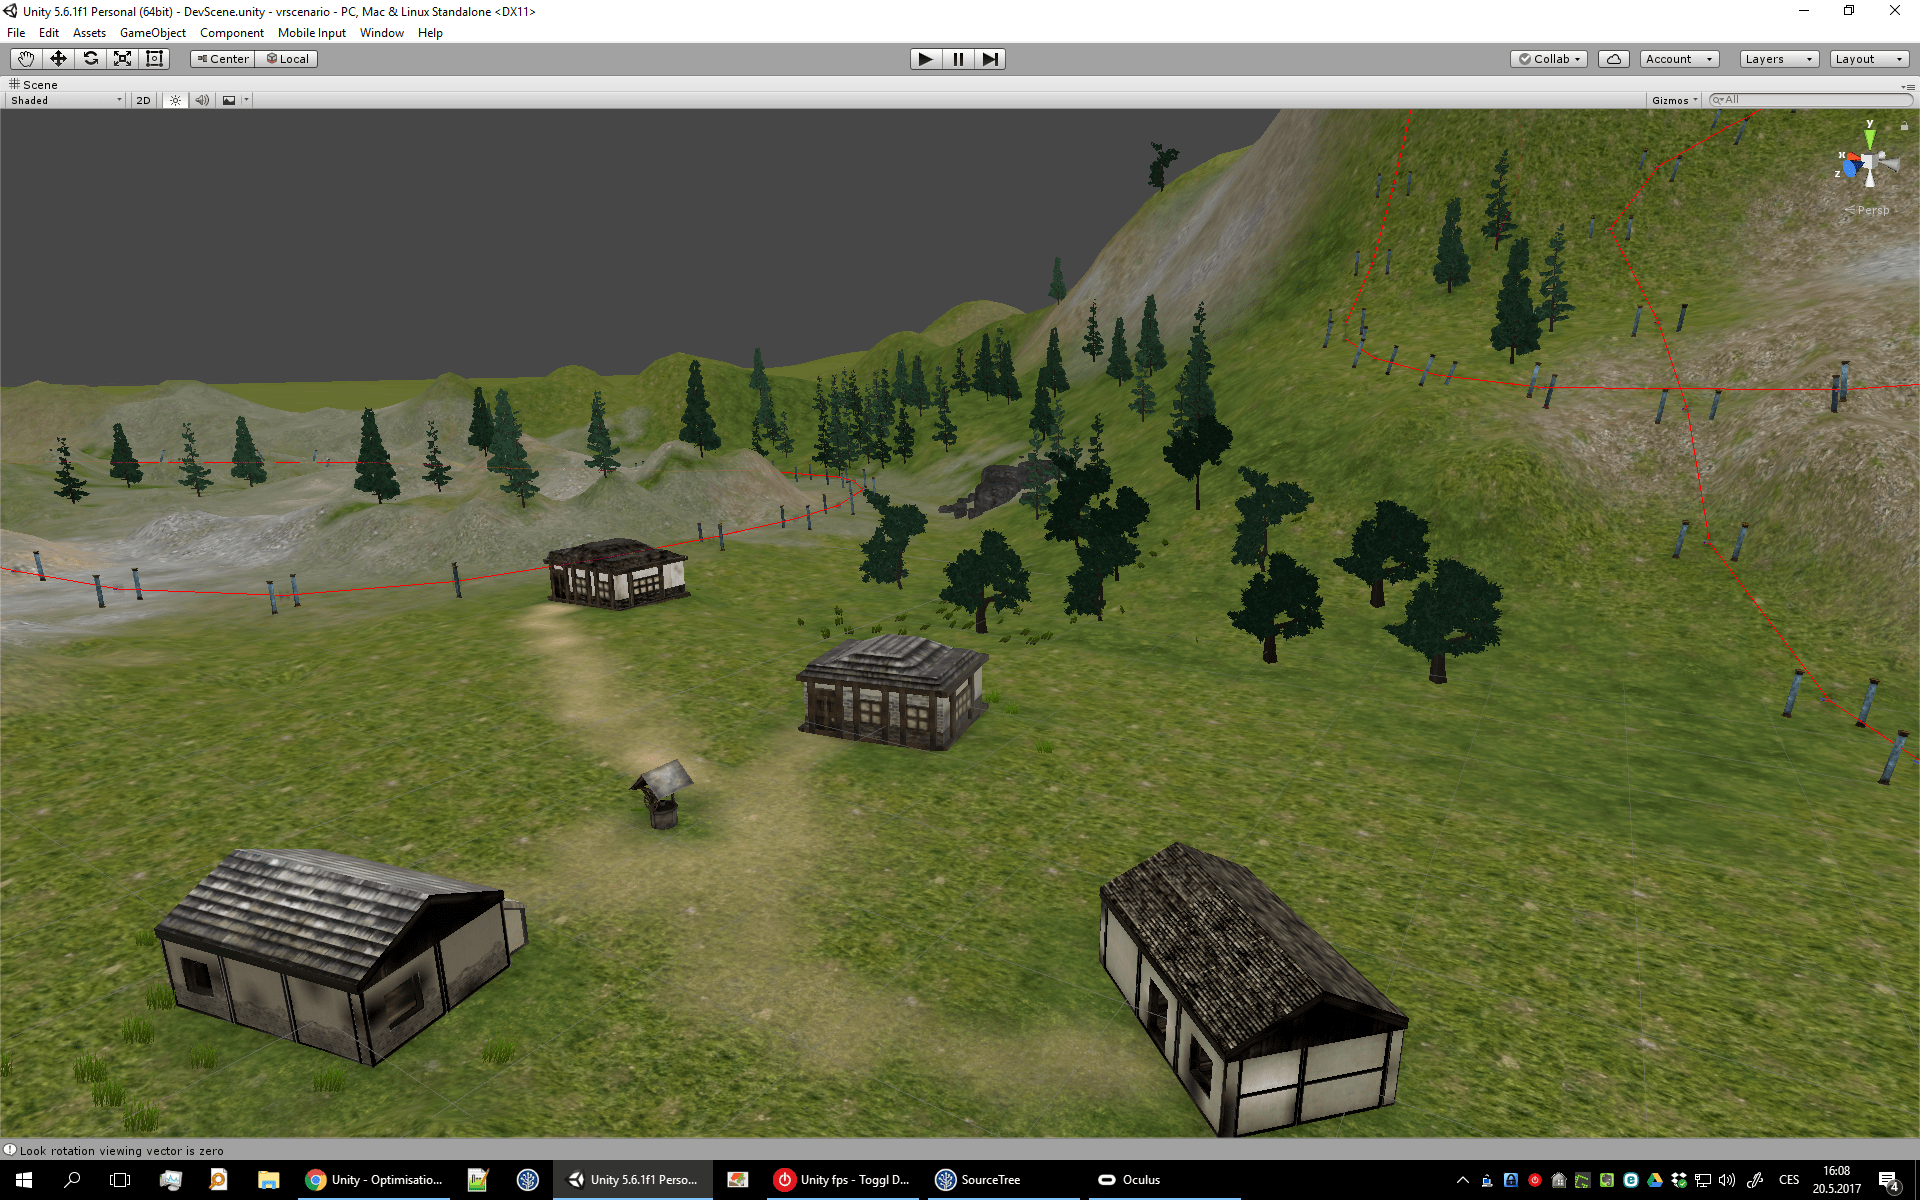
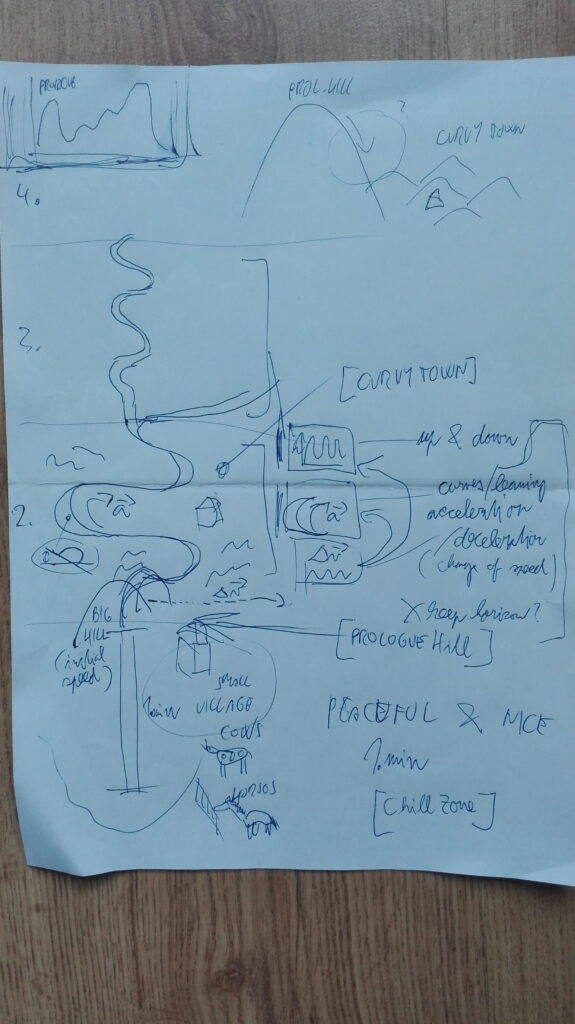
I had an idea what the scene should have looked like. Natural looking landscape with few interesting places – eg. relaxing initial scene, which I called Chill Zone, a giant hill with first downhill, a little village with a water well and something interesting at the end – at the end I decided to place a castle there. I wanted to provide an experience with a prologue and build-up to climax.
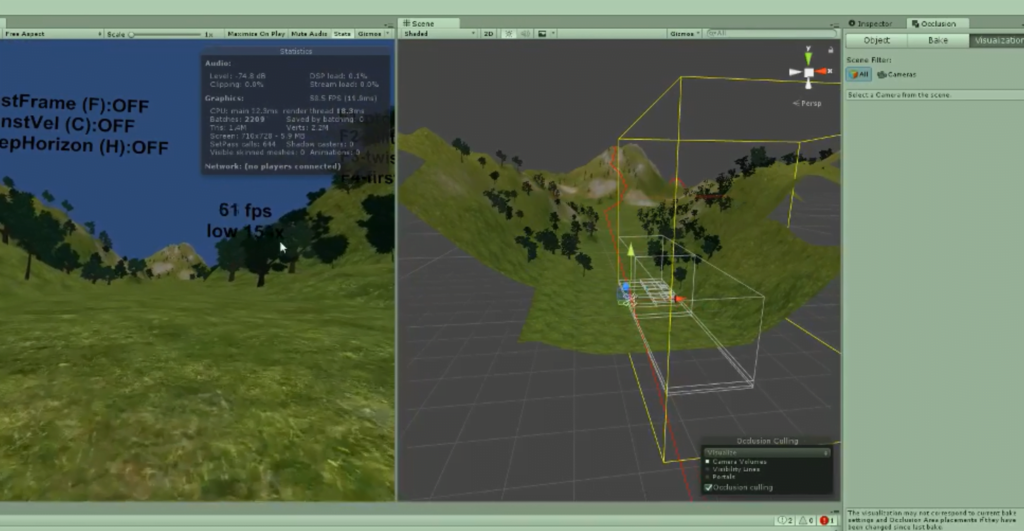
This decision of having wide open space, long draw distances and the substantial amount of details did not go so well with VR. I wanted to make it look better, to have a lot of details, to be able to use higher anti-aliasing, use better textures, but I could not due to the performance. I wanted to have a nice looking natural scene, but I could not do that in such a short time I had for the development. I wanted details but they were too performance demanding at this scope. Mostly because of the draw distance. I tried to add a fog, but it looked awful. I had to change my landscape a bit to at least to take advantage of few basic performance optimizations, namely occlusion culling. Occlusion culling brought a huge performance gain. However, I had to introduce a lot of terrain changes. However, even when I tried I could not use it everywhere without changing a substantial amount of the track. I also used LOD and baked lighting and few more optimizations. If I were to do that again I would not choose an outdoor environment or I would design the whole track and terrain having occlusion culling in mind right from the beginning.
Fixed time countdown at the beginning of the scene
I have prepared the scene with fixed 30s waiting time at the beginning for volunteers to accommodate to the experience before the transition through the virtual environment begins. It is good when everything works properly – volunteer puts on the HMD, I help them adjust the straps, tell them what to do in the scene and the experiment begins. However when there are issues – for example – it takes longer to adjust HMD into correct position or they have an additional question before the beginning the experiment, I need to exit the scene before the timer goes up, return to the main menu and launch it again. I have not implemented keyboard shortcuts to skip or freeze the timer. If I were to test with more people I would add this feature, because it would make experiment process more streamlined and without having to relaunch the scene manually.
I had implemented 3 shortcuts to skip to various parts of the track which proved to be practical. I wish I had done this with the timer.
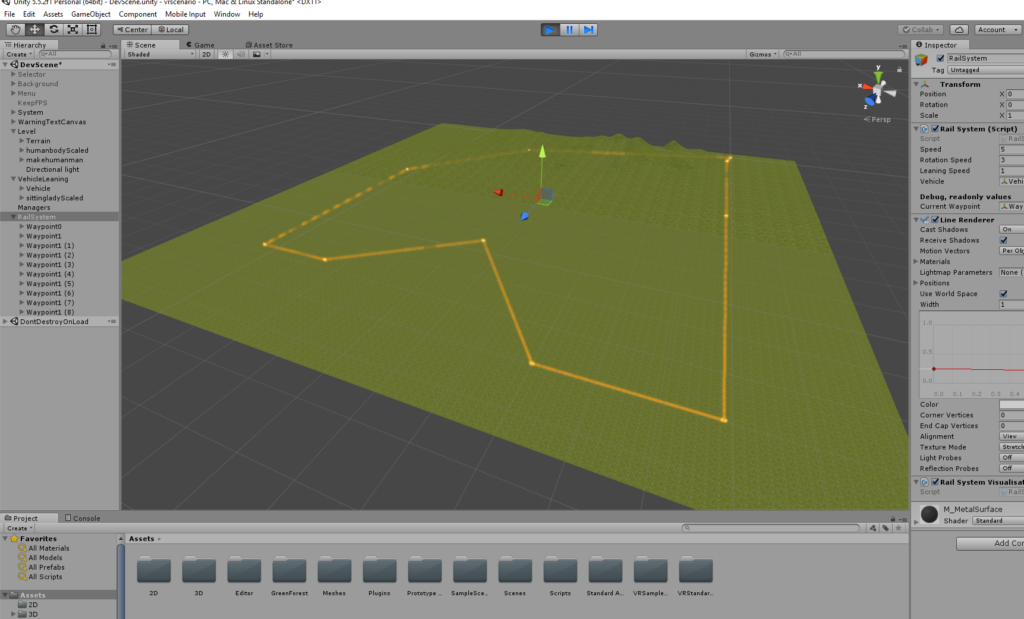
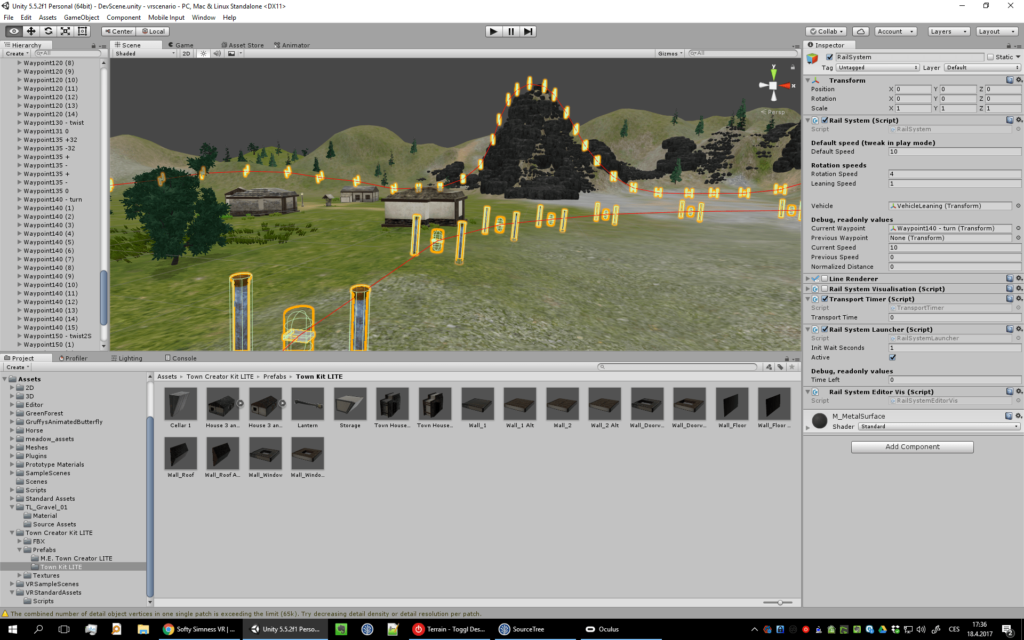
Track made out of only straight lines and hard-coded speeds
When I began designing and figuring out how to implement the track (path which users take when being transitioned through the virtual environment) I looked at assets available in Unity Store, but those which were looking good were not free and since I wanted really basic tracks system I thought I would just create one by myself. It was good in a sense I knew it very well and was able to tweak it the way I wanted it. However, for some reason I just implemented straight line waypoint to waypoint system. I totally forgot about the curves. I designed the scene and used this system for the whole track. I added an interpolation to rotate the vehicle on the track towards the next point smoothly. It felt a bit too snappy, so I inspected my code very carefully and found out that I was inputting new rotation value in lerp function instead of original value. After fixing that, it felt alright. However, after a couple of sessions with volunteers, I got feedback that the movement felt artificial and was too discrete, not very smooth.
“I got really irritated by the lack of smooth animations and movement. The abrupt changes of direction and speed felt artificial”
As a solo developer and tester of my own project, I was accustomed to the artificiality of the movement and also to the way I hard-coded speeds of the vehicle into the waypoints. I implemented interpolation of course, but sometimes it would have been better to simulate the speed (according to the weight, etc) instead of setting the speed for waypoints manually.
Terrain design
I used basic terrain in Unity with default settings and it was fine for basic terrain design. It is also pretty easy to do. Just like in image editors, you can select a brush, its size and shape and “draw” the terrain height, textures, smooth it out, put details like rocks and trees. However, it looks ugly, because the geometry of the terrain is limited and there are sharp edges everywhere. Maybe I should have looked at some tutorials and 3rd party terrain tools.
Takeaways
Optimize early for VR. The profiler is your friend. Either design your levels with optimizations techniques in mind or design, implement, optimize and iterate. It is hard to change whole scenes at the end when you suddenly realize you need to optimize. Surprisingly, optimizations for mobiles are also a good fit for VR.
Test your project with other people. Never solo dev till the very end. Have a bunch of people willing to try it. Invite them over for pizza or something and have an informal playtest. You, as a developer, are blind when it comes to certain flaws in your design.
Investigate/Check your tools before you start. It is tempting to just go ahead and just create but it might be worth it to spend few hours on trying on various tools before you choose the one which you will use for the rest of the project.
Implement cheat codes and debug helper functions to help with your development and testing. Think about how your project is gonna be used and what irregular situations might occur. Keyboard shortcuts are great for this. Or debug UI.
Build a community around your project. Post a relevant content. Give them something back for their interest. Write a postmortem 😀
Original post on Gamasutra: https://www.gamasutra.com/blogs/RomanLuks/20171023/308040/Softy_Simness__Postmortem
Leave a Reply